Data Analytics using Python with JupyterLab
Data analytics helps a business perform more efficiently, maximize profits, and make strategically guided decisions. It is an important stage in a pipeline of Data Pipeline Studio (DPS) that uses machine learning algorithms for analyzing the available data.
Data Pipeline Studio (DPS) provides the option of either using predefined algorithms like Random Forest Classifiers, Support Vector Classifier or creating custom algorithms according to the specific requirement.
DPS supports Python with JupyterLab for the data analytics stage with Snowflake or Amazon S3 as a data lake. The following table lists the supported combinations of source and target that you can use while creating a data analytics job using Python with JupyterLab.
| Data Source | Data Analytics | Data Lake (Target) |
|---|---|---|
| Data Lake as Source | ||
| Snowflake | Python with JupyterLab | Snowflake |
| Snowflake | Python with JupyterLab | Amazon S3 |
| Amazon S3 | Python with JupyterLab | Snowflake |
| Amazon S3 | Python with JupyterLab | Amazon S3 |
| Analytical Data Store as Source | ||
| Amazon RDS MySQL | Python with JupyterLab | Snowflake |
| Amazon RDS PostgreSQL | Python with JupyterLab | Snowflake |
| Microsoft SQL Server | Python with JupyterLab | Snowflake |
| MySQL | Python with JupyterLab | Snowflake |
| Oracle | Python with JupyterLab | Snowflake |
| PostgreSQL | Python with JupyterLab | Snowflake |
| Amazon RDS MySQL | Python with JupyterLab | Amazon S3 |
| Amazon RDS PostgreSQL | Python with JupyterLab | Amazon S3 |
| Microsoft SQL Server | Python with JupyterLab | Amazon S3 |
| MySQL | Python with JupyterLab | Amazon S3 |
| Oracle | Python with JupyterLab | Amazon S3 |
| PostgreSQL | Python with JupyterLab | Amazon S3 |
The process of creating a data analytics pipeline and running the job involves the following high-level tasks:
- On the home page of DPS, add the following stages and connect them as shown below:
- Data Lake: Snowflake
- Data Analytics: Python with JupyterLab
- Data Lake: Snowflake

- Configure the Snowflake nodes. Ensure that JupyterLab has access to the S3 node in the data pipeline. See Setting up S3 access from JupyterLab.
- Click the Python with JupyterLab node. Click Deploy to deploy Python with JupterLab.

Note:
Each stage of a feature in Data Pipeline Studio (DPS) supports only one active JupyterLab node in the pipeline at a time. If you add a second node to the same stage, the previously added node becomes inactive, and only the most recently added node will function.
- On the Dev screen, click +Add Instance. Select the required instance. When deploying the Python with JupyterLab node in your data analytics pipeline, the memory requirements can vary depending on the code you implement in the Jupyter Notebook. For optimal performance, the Calibo Accelerate platform recommends using a minimum of 4 GB RAM, 50GB Hard-disk, and 2vCPU.
- Click Configure to configure the selected instance before adding the technology.
- In the Cloud Account and Network Setting side drawer, do the following:
-
Publish the pipeline.
Note:
Deployment of Python with JupyterLab is currently limited to Docker Container mode in Calibo Accelerate. Kubernetes and OpenShift are not supported for this technology.

| Field | Action/ Description |
|---|---|
| Name | Provide a logical name for your instance. |
| Hard Disk Size | Select the desired hard disk size from the list. |
| Cloud Account | The cloud account on which you configure a cloud instance is auto-populated. |
| Use Public or Private Subnet | Choose between public and private subnets. |
| Security Groups | Select one or more security groups. They act as virtual firewalls controlling inbound and outbound traffic for instances hosting your Docker containers. |
| Security Groups | If you configure settings for an Azure instance, select one or more application security groups. This field is optional. |
| AMI ID (Optional) | Select or enter the unique ID of the AWS AMI that you want to launch. |
When you create a data analytics job, you can add the following type of algorithms:
-
Predefined algorithms like Random Forest Classifiers, Support Vector Classifier, Logistic Regression, Linear regression and so on.
-
Custom algorithms - See Create Custom Algorithm for a Data Analytics Job
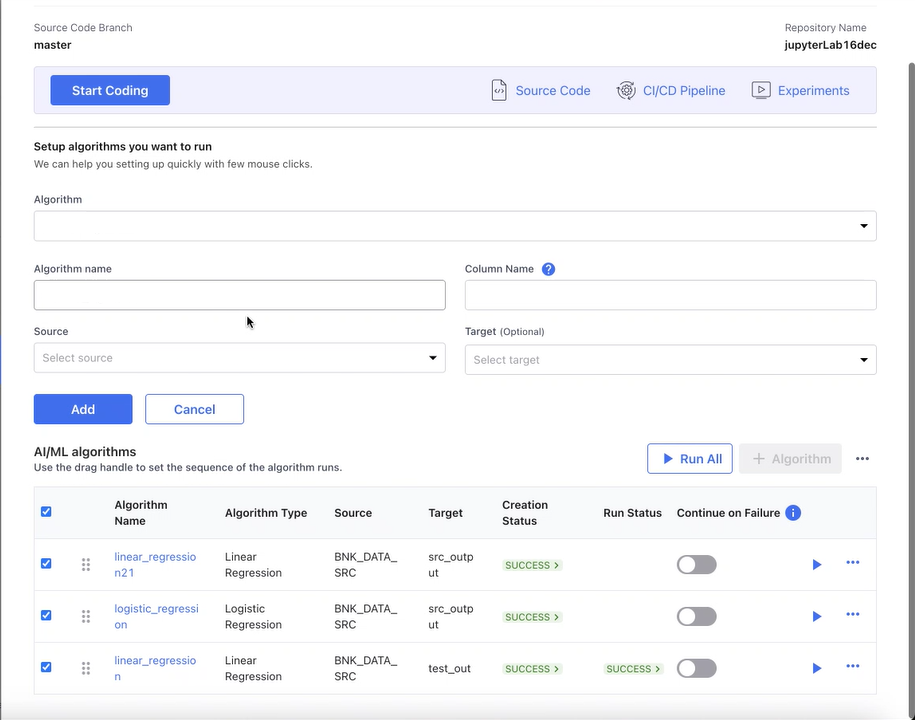
To add an algorithm
-
Click +Algorithm. Provide the following information:
-
Algorithm: Select a predefined algorithm like random Random Forest Classifier, Support Vector Classifier and so on, or Custom Algorithm to be used for data analytics.
-
Algorithm Name: Provide a unique name for the algorithm.
-
Column Name: Select the column to run the selected algorithm.
-
Source: Select a file or table from the source, to which the column belongs on which the algorithm will be run.
-
Target: Select a file or table from the target in which the output of the algorithm run will be stored. You can either select an existing file or table or create a new one.

Note:
Ensure that the selected column contains binary data only.
-
-
Click Add.
-
After you click Add, the Creation Status displays the following types of status depending on whether the data analytics job for the selected algorithm is created or not:
-
In Progress - when the job is being created.
-
Success - when the job is created successfully.
-
Failed - when the job creation fails.
-
To add multiple algorithms, repeat steps
-
-
To add multiple algorithms, repeat steps 1 and 2.
-
Enable the Continue on Failure setting for the required algorithms. By turning on the setting, if an algorithm in the sequence fails, the remaining algorithms continue to run.
You can add one or more algorithms to a data analytics job. You can either run each algorithm manually or you can run all the algorithms in a sequence. A Jenkins job is created for each stage of the pipeline with the following folder structure and naming convention:
Product_Release_Feature folder > Stage name folder > run_ml_algorithm folder.
To run the algorithms, choose one of the following options:
-
Click Run All to run the complete list of algorithms in the given sequence. You can use the drag handle
 to change the sequence of the algorithms. If Continue on Failure is enabled, the algorithms continue to run in the specified sequence even if one algorithm fails.
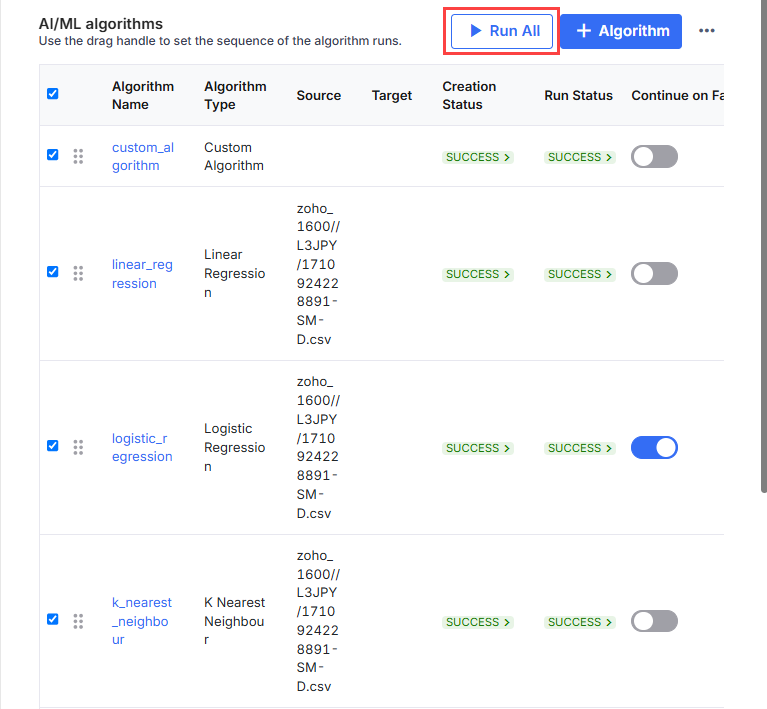
-
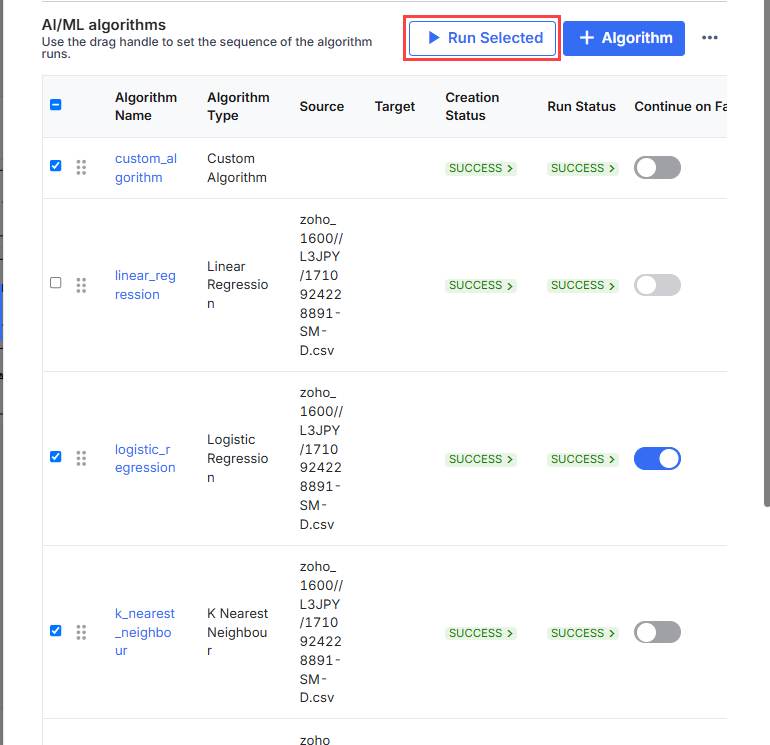
Click Run Selected to run a few algorithms. Select the algorithms that you want to run from the list and then click Run Selected.
The Run Status of the pipeline can be one of the following:
-
Initiated - The pipeline run has started.
-
Running - The pipeline is running.
-
Success - The pipeline run is successful.
-
Failed - The pipeline run has failed.
-
Terminated -The run is manually terminated.
-
Not Run - If the previous algorithm fails, the subsequent algorithms go into this status.
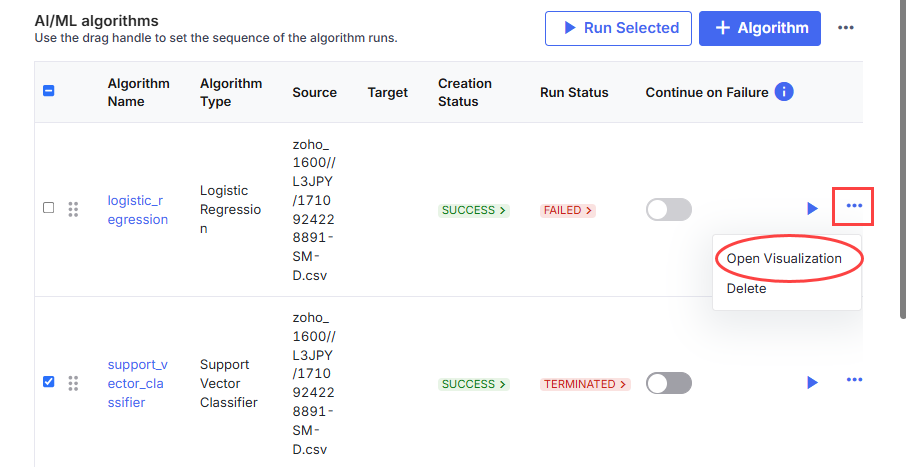
If you want to view the output of an algorithm that has run successfully, do the following:
-
Click the ellipsis (...) and then click Open Visualization to view the dashboard. View the dashboard generated from the pickle file.

In case the algorithm fails and you need to troubleshoot it, click the ellipsis (…) adjacent to +Algorithm and click Copy JupyterLab Token. When you click a specific algorithm, it navigates you to JupyterLab Notebook, you need the token to log in. Once you have logged in, you can troubleshoot the code.
You can check the logs for the data analytics jobs that are created in Data Pipeline Studio. A Jenkins job is triggered for each stage of a pipeline. You can navigate to Jenkins from the Calibo Accelerate platform to view the logs.
-
Click the data analytics node. On the side drawer, click CI/CD Pipeline.

-
Click Deploy.

-
On the Jenkins screen click Console Output in the left navigation pane.

-
Search for Lazsa-Core-Jobs run-ml-algorithms. You can view the logs for a specific job.

There are multiple ways to navigate to Jenkins logs from the Calibo Accelerate platform.
Option Description By clicking the Creation Status of an algorithm. 
By clicking the Run Status of an algorithm. 
By clicking View Details > Select the pipeline run > Click View Logs 
When you click any of the above links, you are navigated to the specific build in Jenkins 
Click Console Output in the left navigation pane to view the logs for the specific build. 
If your JupyterLab algorithm shows the run status as Failed, do the following:
Click the Run Status. This navigates you to the Jenkins logs for the specific job. You can view the error related to your job.
The Data Pipeline Studio logs important events related to a data analytics job in the form of audit logs. The events include the following:
-
Adding an algorithm to a data analytics job
-
Deleting an algorithm from a data analytics job
-
Initiating the run for algorithms
-
Stopping the run for algorithms
-
Disable run for the algorithm
-
Enable run for the algorithm
-
Change the sequence in which the algorithms are run
-
Enable Continue on Failure setting for an algorithm
To view the audit logs for a data analytics job, do one of the following:
-
View audit logs from the Calibo Accelerate platform
-
In the Calibo Accelerate platform, click Configuration in the left navigation pane.
-
On the Platform Setup screen, on the Audit Logs tile, click View.
-
Use the filters to view the data analytics audit logs.
-
-
View audit logs from Data Pipeline Studio
-
On the Data Pipeline Studio screen, click the ellipsis (...).
-
Click Audit Logs.
-
Use the filters to view the data analytics audit logs.
-
| What's next? Snowflake Custom Transformation Job |